[fusion_builder_container hundred_percent=”no” hundred_percent_height=”no” hundred_percent_height_scroll=”no” hundred_percent_height_center_content=”yes” equal_height_columns=”no” hide_on_mobile=”small-visibility,medium-visibility,large-visibility” status=”published” border_style=”solid” gradient_start_position=”0″ gradient_end_position=”100″ gradient_type=”linear” radial_direction=”center center” linear_angle=”180″ background_position=”center center” background_repeat=”no-repeat” fade=”no” background_parallax=”none” enable_mobile=”no” parallax_speed=”0.3″ background_blend_mode=”none” video_aspect_ratio=”16:9″ video_loop=”yes” video_mute=”yes” filter_hue=”0″ filter_saturation=”100″ filter_brightness=”100″ filter_contrast=”100″ filter_invert=”0″ filter_sepia=”0″ filter_opacity=”100″ filter_blur=”0″ filter_hue_hover=”0″ filter_saturation_hover=”100″ filter_brightness_hover=”100″ filter_contrast_hover=”100″ filter_invert_hover=”0″ filter_sepia_hover=”0″ filter_opacity_hover=”100″ filter_blur_hover=”0″ type=”legacy”][fusion_builder_row][fusion_builder_column type=”1_1″ type=”1_1″ layout=”1_1″ align_self=”auto” content_layout=”column” align_content=”flex-start” valign_content=”flex-start” content_wrap=”wrap” center_content=”no” target=”_self” hide_on_mobile=”small-visibility,medium-visibility,large-visibility” sticky_display=”normal,sticky” order_medium=”0″ order_small=”0″ hover_type=”none” border_style=”solid” box_shadow=”no” box_shadow_blur=”0″ box_shadow_spread=”0″ background_type=”single” gradient_start_position=”0″ gradient_end_position=”100″ gradient_type=”linear” radial_direction=”center center” linear_angle=”180″ background_position=”left top” background_repeat=”no-repeat” background_blend_mode=”none” filter_type=”regular” filter_hue=”0″ filter_saturation=”100″ filter_brightness=”100″ filter_contrast=”100″ filter_invert=”0″ filter_sepia=”0″ filter_opacity=”100″ filter_blur=”0″ filter_hue_hover=”0″ filter_saturation_hover=”100″ filter_brightness_hover=”100″ filter_contrast_hover=”100″ filter_invert_hover=”0″ filter_sepia_hover=”0″ filter_opacity_hover=”100″ filter_blur_hover=”0″ animation_direction=”left” animation_speed=”0.3″ first=”true” last=”true” border_position=”all” min_height=”” link=””][fusion_breadcrumbs hide_on_mobile=”small-visibility,medium-visibility,large-visibility” sticky_display=”normal,sticky” animation_direction=”left” animation_speed=”0.3″ /][/fusion_builder_column][fusion_builder_column type=”1_1″ type=”1_1″ layout=”1_1″ align_self=”auto” content_layout=”column” align_content=”flex-start” valign_content=”flex-start” content_wrap=”wrap” center_content=”no” target=”_self” hide_on_mobile=”small-visibility,medium-visibility,large-visibility” sticky_display=”normal,sticky” order_medium=”0″ order_small=”0″ hover_type=”none” border_style=”solid” box_shadow=”no” box_shadow_blur=”0″ box_shadow_spread=”0″ background_type=”single” gradient_start_position=”0″ gradient_end_position=”100″ gradient_type=”linear” radial_direction=”center center” linear_angle=”180″ background_position=”left top” background_repeat=”no-repeat” background_blend_mode=”none” filter_type=”regular” filter_hue=”0″ filter_saturation=”100″ filter_brightness=”100″ filter_contrast=”100″ filter_invert=”0″ filter_sepia=”0″ filter_opacity=”100″ filter_blur=”0″ filter_hue_hover=”0″ filter_saturation_hover=”100″ filter_brightness_hover=”100″ filter_contrast_hover=”100″ filter_invert_hover=”0″ filter_sepia_hover=”0″ filter_opacity_hover=”100″ filter_blur_hover=”0″ animation_direction=”left” animation_speed=”0.3″ first=”true” last=”true” border_position=”all” min_height=”” link=””][fusion_text rule_style=”default” animation_direction=”left” animation_speed=”0.3″ hide_on_mobile=”small-visibility,medium-visibility,large-visibility” sticky_display=”normal,sticky” text_color=”#6bbcac” margin_top=”50″]
Go-Live Date: 04.07.2022
[/fusion_text][/fusion_builder_column][fusion_builder_column type=”1_1″ type=”1_1″ layout=”1_1″ align_self=”auto” content_layout=”column” align_content=”flex-start” valign_content=”flex-start” content_wrap=”wrap” center_content=”no” target=”_self” hide_on_mobile=”small-visibility,medium-visibility,large-visibility” sticky_display=”normal,sticky” order_medium=”0″ order_small=”0″ hover_type=”none” border_style=”solid” box_shadow=”no” box_shadow_blur=”0″ box_shadow_spread=”0″ background_type=”single” gradient_start_position=”0″ gradient_end_position=”100″ gradient_type=”linear” radial_direction=”center center” linear_angle=”180″ background_position=”left top” background_repeat=”no-repeat” background_blend_mode=”none” filter_type=”regular” filter_hue=”0″ filter_saturation=”100″ filter_brightness=”100″ filter_contrast=”100″ filter_invert=”0″ filter_sepia=”0″ filter_opacity=”100″ filter_blur=”0″ filter_hue_hover=”0″ filter_saturation_hover=”100″ filter_brightness_hover=”100″ filter_contrast_hover=”100″ filter_invert_hover=”0″ filter_sepia_hover=”0″ filter_opacity_hover=”100″ filter_blur_hover=”0″ animation_direction=”left” animation_speed=”0.3″ first=”true” last=”true” border_position=”all” min_height=”” link=””][fusion_separator style_type=”shadow” flex_grow=”0″ alignment=”center” hide_on_mobile=”small-visibility,medium-visibility,large-visibility” sticky_display=”normal,sticky” bottom_margin=”0″ sep_color=”#4d4e50″ border_size=”1″ /][/fusion_builder_column][fusion_builder_column type=”1_6″ type=”1_6″ layout=”1_6″ align_self=”auto” content_layout=”column” align_content=”flex-start” valign_content=”flex-start” content_wrap=”wrap” center_content=”no” target=”_self” hide_on_mobile=”small-visibility,medium-visibility,large-visibility” sticky_display=”normal,sticky” order_medium=”0″ order_small=”0″ hover_type=”none” border_style=”solid” box_shadow=”no” box_shadow_blur=”0″ box_shadow_spread=”0″ background_type=”single” gradient_start_position=”0″ gradient_end_position=”100″ gradient_type=”linear” radial_direction=”center center” linear_angle=”180″ background_position=”left top” background_repeat=”no-repeat” background_blend_mode=”none” filter_type=”regular” filter_hue=”0″ filter_saturation=”100″ filter_brightness=”100″ filter_contrast=”100″ filter_invert=”0″ filter_sepia=”0″ filter_opacity=”100″ filter_blur=”0″ filter_hue_hover=”0″ filter_saturation_hover=”100″ filter_brightness_hover=”100″ filter_contrast_hover=”100″ filter_invert_hover=”0″ filter_sepia_hover=”0″ filter_opacity_hover=”100″ filter_blur_hover=”0″ animation_direction=”left” animation_speed=”0.3″ first=”true” last=”false” border_position=”all” min_height=”” link=””][fusion_fontawesome icon=”fa-file-word far” spin=”no” linktarget=”_self” bg_size=”-1″ hide_on_mobile=”small-visibility,medium-visibility,large-visibility” sticky_display=”normal,sticky” animation_direction=”left” animation_speed=”0.3″ size=”24″ alignment=”right” circlecolor=”#6bbcac” circlebordercolor=”#6bbcac” circlecolor_hover=”#6bbcac” circlebordercolor_hover=”#6bbcac” /][/fusion_builder_column][fusion_builder_column type=”5_6″ type=”5_6″ layout=”5_6″ align_self=”auto” content_layout=”column” align_content=”flex-start” valign_content=”flex-start” content_wrap=”wrap” center_content=”no” target=”_self” hide_on_mobile=”small-visibility,medium-visibility,large-visibility” sticky_display=”normal,sticky” order_medium=”0″ order_small=”0″ hover_type=”none” border_style=”solid” box_shadow=”no” box_shadow_blur=”0″ box_shadow_spread=”0″ background_type=”single” gradient_start_position=”0″ gradient_end_position=”100″ gradient_type=”linear” radial_direction=”center center” linear_angle=”180″ background_position=”left top” background_repeat=”no-repeat” background_blend_mode=”none” filter_type=”regular” filter_hue=”0″ filter_saturation=”100″ filter_brightness=”100″ filter_contrast=”100″ filter_invert=”0″ filter_sepia=”0″ filter_opacity=”100″ filter_blur=”0″ filter_hue_hover=”0″ filter_saturation_hover=”100″ filter_brightness_hover=”100″ filter_contrast_hover=”100″ filter_invert_hover=”0″ filter_sepia_hover=”0″ filter_opacity_hover=”100″ filter_blur_hover=”0″ animation_direction=”left” animation_speed=”0.3″ first=”false” last=”true” border_position=”all” min_height=”” link=””][fusion_text rule_style=”default” animation_direction=”left” animation_speed=”0.3″ hide_on_mobile=”small-visibility,medium-visibility,large-visibility” sticky_display=”normal,sticky” font_size=”22″ text_transform=”capitalize” text_color=”#f07965″]
Custom Pages on ConcernCenter
[/fusion_text][/fusion_builder_column][fusion_builder_column type=”1_1″ type=”1_1″ layout=”1_1″ align_self=”auto” content_layout=”column” align_content=”flex-start” valign_content=”flex-start” content_wrap=”wrap” center_content=”no” target=”_self” hide_on_mobile=”small-visibility,medium-visibility,large-visibility” sticky_display=”normal,sticky” order_medium=”0″ order_small=”0″ hover_type=”none” border_style=”solid” box_shadow=”no” box_shadow_blur=”0″ box_shadow_spread=”0″ background_type=”single” gradient_start_position=”0″ gradient_end_position=”100″ gradient_type=”linear” radial_direction=”center center” linear_angle=”180″ background_position=”left top” background_repeat=”no-repeat” background_blend_mode=”none” filter_type=”regular” filter_hue=”0″ filter_saturation=”100″ filter_brightness=”100″ filter_contrast=”100″ filter_invert=”0″ filter_sepia=”0″ filter_opacity=”100″ filter_blur=”0″ filter_hue_hover=”0″ filter_saturation_hover=”100″ filter_brightness_hover=”100″ filter_contrast_hover=”100″ filter_invert_hover=”0″ filter_sepia_hover=”0″ filter_opacity_hover=”100″ filter_blur_hover=”0″ animation_direction=”left” animation_speed=”0.3″ first=”true” last=”true” border_position=”all” min_height=”” link=””][fusion_text rule_style=”default” hide_on_mobile=”small-visibility,medium-visibility,large-visibility” sticky_display=”normal,sticky” text_transform=”none” animation_direction=”left” animation_speed=”0.3″]
Feature Description
- This new feature allows Admins to create additional pages on the ConcernCenter platform. These pages will have the same look and feel as the rest of your ConcernCenter platform and are helpful when creating things like site guidelines, ‘how to' instructions, and other important information your users may need.
The Change
- You can add pages to your ConcernCenter platform that contains additional information users may need to access. By using a simple ‘What You See Is What You Get' (WYSIWYG) editor, you can add text for things like Privacy Policies, Site Guidelines, How to Use, and many other options. These pages are added to the footer of the site using the Custom Menu feature (described below).

How To Use It
*This feature must be turned on by your ConcernCenter Success Manager before it is accessible in your Admin Portal. Please reach out if you would like this feature turned on.
- The Custom Pages activity is accessed in your Admin Portal under the Custom Pages menu. Select ‘Add New' and the WYSIWYG editor will appear to create and design your page. Once finished, select ‘Update' and your page will be saved.
NOTE: This feature must be used in conjunction with the Custom Menu feature for it to appear on your site. To make your new page appear in the footer, follow the Custom Menu directions below to attach a Custom Page to a Custom Menu.

[/fusion_text][fusion_separator style_type=”shadow” flex_grow=”0″ alignment=”center” hide_on_mobile=”small-visibility,medium-visibility,large-visibility” sticky_display=”normal,sticky” top_margin=”20″ sep_color=”#4d4e50″ border_size=”1″ bottom_margin=”30″ /][/fusion_builder_column][fusion_builder_column type=”1_6″ type=”1_6″ layout=”1_6″ align_self=”auto” content_layout=”column” align_content=”flex-start” valign_content=”flex-start” content_wrap=”wrap” center_content=”no” target=”_self” hide_on_mobile=”small-visibility,medium-visibility,large-visibility” sticky_display=”normal,sticky” order_medium=”0″ order_small=”0″ hover_type=”none” border_style=”solid” box_shadow=”no” box_shadow_blur=”0″ box_shadow_spread=”0″ background_type=”single” gradient_start_position=”0″ gradient_end_position=”100″ gradient_type=”linear” radial_direction=”center center” linear_angle=”180″ background_position=”left top” background_repeat=”no-repeat” background_blend_mode=”none” filter_type=”regular” filter_hue=”0″ filter_saturation=”100″ filter_brightness=”100″ filter_contrast=”100″ filter_invert=”0″ filter_sepia=”0″ filter_opacity=”100″ filter_blur=”0″ filter_hue_hover=”0″ filter_saturation_hover=”100″ filter_brightness_hover=”100″ filter_contrast_hover=”100″ filter_invert_hover=”0″ filter_sepia_hover=”0″ filter_opacity_hover=”100″ filter_blur_hover=”0″ animation_direction=”left” animation_speed=”0.3″ first=”true” last=”false” border_position=”all” min_height=”” link=””][fusion_fontawesome icon=”fa-file-alt far” spin=”no” linktarget=”_self” bg_size=”-1″ hide_on_mobile=”small-visibility,medium-visibility,large-visibility” sticky_display=”normal,sticky” animation_direction=”left” animation_speed=”0.3″ size=”24″ circlecolor_hover=”#6bbcac” circlecolor=”#6bbcac” circlebordercolor=”#6bbcac” circlebordercolor_hover=”#6bbcac” alignment=”right” /][/fusion_builder_column][fusion_builder_column type=”5_6″ type=”5_6″ layout=”5_6″ align_self=”auto” content_layout=”column” align_content=”flex-start” valign_content=”flex-start” content_wrap=”wrap” center_content=”no” target=”_self” hide_on_mobile=”small-visibility,medium-visibility,large-visibility” sticky_display=”normal,sticky” order_medium=”0″ order_small=”0″ hover_type=”none” border_style=”solid” box_shadow=”no” box_shadow_blur=”0″ box_shadow_spread=”0″ background_type=”single” gradient_start_position=”0″ gradient_end_position=”100″ gradient_type=”linear” radial_direction=”center center” linear_angle=”180″ background_position=”left top” background_repeat=”no-repeat” background_blend_mode=”none” filter_type=”regular” filter_hue=”0″ filter_saturation=”100″ filter_brightness=”100″ filter_contrast=”100″ filter_invert=”0″ filter_sepia=”0″ filter_opacity=”100″ filter_blur=”0″ filter_hue_hover=”0″ filter_saturation_hover=”100″ filter_brightness_hover=”100″ filter_contrast_hover=”100″ filter_invert_hover=”0″ filter_sepia_hover=”0″ filter_opacity_hover=”100″ filter_blur_hover=”0″ animation_direction=”left” animation_speed=”0.3″ first=”false” last=”true” border_position=”all” min_height=”” link=””][fusion_text rule_style=”default” animation_direction=”left” animation_speed=”0.3″ hide_on_mobile=”small-visibility,medium-visibility,large-visibility” sticky_display=”normal,sticky” font_size=”22″ text_color=”#f07965″]
Custom Menus On ConcernCenter
[/fusion_text][/fusion_builder_column][fusion_builder_column type=”1_1″ type=”1_1″ layout=”1_1″ align_self=”auto” content_layout=”column” align_content=”flex-start” valign_content=”flex-start” content_wrap=”wrap” center_content=”no” target=”_self” hide_on_mobile=”small-visibility,medium-visibility,large-visibility” sticky_display=”normal,sticky” order_medium=”0″ order_small=”0″ hover_type=”none” border_style=”solid” box_shadow=”no” box_shadow_blur=”0″ box_shadow_spread=”0″ background_type=”single” gradient_start_position=”0″ gradient_end_position=”100″ gradient_type=”linear” radial_direction=”center center” linear_angle=”180″ background_position=”left top” background_repeat=”no-repeat” background_blend_mode=”none” filter_type=”regular” filter_hue=”0″ filter_saturation=”100″ filter_brightness=”100″ filter_contrast=”100″ filter_invert=”0″ filter_sepia=”0″ filter_opacity=”100″ filter_blur=”0″ filter_hue_hover=”0″ filter_saturation_hover=”100″ filter_brightness_hover=”100″ filter_contrast_hover=”100″ filter_invert_hover=”0″ filter_sepia_hover=”0″ filter_opacity_hover=”100″ filter_blur_hover=”0″ animation_direction=”left” animation_speed=”0.3″ first=”true” last=”true” border_position=”all” min_height=”” link=””][fusion_text rule_style=”default” hide_on_mobile=”small-visibility,medium-visibility,large-visibility” sticky_display=”normal,sticky” text_transform=”none” animation_direction=”left” animation_speed=”0.3″]
- This is another new feature that allows Admins to add links in the footer of your platform that will connect the user to either Custom Pages or URL links they might find helpful. This feature is meant to give users access to global site or larger organizational information.
The Change
- You can add menus to your ConcernCenter platform footer with links to Custom Pages or URL links. Once you select what type of information you want to link to, simply identify where, in the footer, you'd like the menu to appear for users to view the additional information.
How To Use It
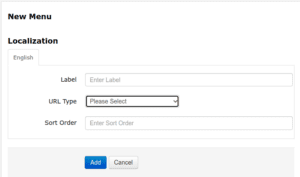
- The Custom Menu activity is accessed in your Admin Portal under the ‘Custom Menu' menu. Select ‘Add New' and three fields should appear.
- Label – Enter the title of the menu that will appear as the link in the footer of the site
- Link Type
- Select ‘Custom Page' if you are linking to a Custom Page that you previously created (see ‘Custom Page' above)
- A new drop down field will appear labeled Custom Page with all of the Custom Pages available
- Select the appropriate Custom Page
- Select ‘Custom URL' if you are linking to another website
- A new field will appear labeled URL where you will enter the URL of the site you want linked
- Enter the URL in this field
- Select ‘Custom Page' if you are linking to a Custom Page that you previously created (see ‘Custom Page' above)
- Sort Order – Enter a number to identify where you would like this menu item to appear in relation to all of the other Custom Menus. 1 is the left most item in the footer (after ‘Home' and ‘Email Us') and as the numbers increase, the menu item is added to the right. ‘Home' and ‘Email Us' will always appear first and second, in the order. A sort order of 1 would place the menu item immediately to the right of ‘Email Us'.
NOTE: If linking a Custom Menu to a Custom Page, create the Custom Page before creating the Custom Menu. That way you will be able to select the page to link it in the menu.

[/fusion_text][fusion_separator style_type=”shadow” flex_grow=”0″ alignment=”center” hide_on_mobile=”small-visibility,medium-visibility,large-visibility” sticky_display=”normal,sticky” top_margin=”20″ bottom_margin=”30″ sep_color=”#4d4e50″ border_size=”1″ /][/fusion_builder_column][fusion_builder_column type=”1_6″ type=”1_6″ layout=”1_6″ align_self=”auto” content_layout=”column” align_content=”flex-start” valign_content=”flex-start” content_wrap=”wrap” center_content=”no” target=”_self” hide_on_mobile=”small-visibility,medium-visibility,large-visibility” sticky_display=”normal,sticky” order_medium=”0″ order_small=”0″ hover_type=”none” border_style=”solid” box_shadow=”no” box_shadow_blur=”0″ box_shadow_spread=”0″ background_type=”single” gradient_start_position=”0″ gradient_end_position=”100″ gradient_type=”linear” radial_direction=”center center” linear_angle=”180″ background_position=”left top” background_repeat=”no-repeat” background_blend_mode=”none” filter_type=”regular” filter_hue=”0″ filter_saturation=”100″ filter_brightness=”100″ filter_contrast=”100″ filter_invert=”0″ filter_sepia=”0″ filter_opacity=”100″ filter_blur=”0″ filter_hue_hover=”0″ filter_saturation_hover=”100″ filter_brightness_hover=”100″ filter_contrast_hover=”100″ filter_invert_hover=”0″ filter_sepia_hover=”0″ filter_opacity_hover=”100″ filter_blur_hover=”0″ animation_direction=”left” animation_speed=”0.3″ first=”true” last=”false” border_position=”all” min_height=”” link=””][fusion_fontawesome icon=”fa-plus fas” spin=”no” linktarget=”_self” bg_size=”-1″ hide_on_mobile=”small-visibility,medium-visibility,large-visibility” sticky_display=”normal,sticky” animation_direction=”left” animation_speed=”0.3″ size=”24″ circlecolor_hover=”#6bbcac” circlecolor=”#6bbcac” circlebordercolor=”#6bbcac” circlebordercolor_hover=”#6bbcac” alignment=”right” /][/fusion_builder_column][fusion_builder_column type=”5_6″ type=”5_6″ layout=”5_6″ align_self=”auto” content_layout=”column” align_content=”flex-start” valign_content=”flex-start” content_wrap=”wrap” center_content=”no” target=”_self” hide_on_mobile=”small-visibility,medium-visibility,large-visibility” sticky_display=”normal,sticky” order_medium=”0″ order_small=”0″ hover_type=”none” border_style=”solid” box_shadow=”no” box_shadow_blur=”0″ box_shadow_spread=”0″ background_type=”single” gradient_start_position=”0″ gradient_end_position=”100″ gradient_type=”linear” radial_direction=”center center” linear_angle=”180″ background_position=”left top” background_repeat=”no-repeat” background_blend_mode=”none” filter_type=”regular” filter_hue=”0″ filter_saturation=”100″ filter_brightness=”100″ filter_contrast=”100″ filter_invert=”0″ filter_sepia=”0″ filter_opacity=”100″ filter_blur=”0″ filter_hue_hover=”0″ filter_saturation_hover=”100″ filter_brightness_hover=”100″ filter_contrast_hover=”100″ filter_invert_hover=”0″ filter_sepia_hover=”0″ filter_opacity_hover=”100″ filter_blur_hover=”0″ animation_direction=”left” animation_speed=”0.3″ first=”false” last=”true” border_position=”all” min_height=”” link=””][fusion_text rule_style=”default” animation_direction=”left” animation_speed=”0.3″ hide_on_mobile=”small-visibility,medium-visibility,large-visibility” sticky_display=”normal,sticky” font_size=”22″ text_transform=”capitalize” text_color=”#f07965″ content_alignment=”left”]
Additional Improvements
[/fusion_text][/fusion_builder_column][fusion_builder_column type=”1_1″ type=”1_1″ layout=”1_1″ align_self=”auto” content_layout=”column” align_content=”flex-start” valign_content=”flex-start” content_wrap=”wrap” center_content=”no” target=”_self” hide_on_mobile=”small-visibility,medium-visibility,large-visibility” sticky_display=”normal,sticky” order_medium=”0″ order_small=”0″ hover_type=”none” border_style=”solid” box_shadow=”no” box_shadow_blur=”0″ box_shadow_spread=”0″ background_type=”single” gradient_start_position=”0″ gradient_end_position=”100″ gradient_type=”linear” radial_direction=”center center” linear_angle=”180″ background_position=”left top” background_repeat=”no-repeat” background_blend_mode=”none” filter_type=”regular” filter_hue=”0″ filter_saturation=”100″ filter_brightness=”100″ filter_contrast=”100″ filter_invert=”0″ filter_sepia=”0″ filter_opacity=”100″ filter_blur=”0″ filter_hue_hover=”0″ filter_saturation_hover=”100″ filter_brightness_hover=”100″ filter_contrast_hover=”100″ filter_invert_hover=”0″ filter_sepia_hover=”0″ filter_opacity_hover=”100″ filter_blur_hover=”0″ animation_direction=”left” animation_speed=”0.3″ first=”true” last=”true” border_position=”all” min_height=”” link=””][fusion_text rule_style=”default” hide_on_mobile=”small-visibility,medium-visibility,large-visibility” sticky_display=”normal,sticky” text_transform=”none” animation_direction=”left” animation_speed=”0.3″]
- A verbiage change to the ‘Contact This Resource' button that appears on Resource cards now makes it more clear what happens after the user clicks this button. The button now says, ‘Email This Resource'.
- Additional bug fixes to the Admin Portal
[/fusion_text][fusion_separator style_type=”shadow” flex_grow=”0″ alignment=”center” hide_on_mobile=”small-visibility,medium-visibility,large-visibility” sticky_display=”normal,sticky” top_margin=”20″ bottom_margin=”30″ sep_color=”#4d4e50″ border_size=”1″ /][/fusion_builder_column][fusion_builder_column type=”1_1″ type=”1_1″ layout=”1_1″ align_self=”auto” content_layout=”column” align_content=”flex-start” valign_content=”flex-start” content_wrap=”wrap” center_content=”no” target=”_self” hide_on_mobile=”small-visibility,medium-visibility,large-visibility” sticky_display=”normal,sticky” order_medium=”0″ order_small=”0″ hover_type=”none” border_style=”solid” box_shadow=”no” box_shadow_blur=”0″ box_shadow_spread=”0″ background_type=”single” gradient_start_position=”0″ gradient_end_position=”100″ gradient_type=”linear” radial_direction=”center center” linear_angle=”180″ background_position=”left top” background_repeat=”no-repeat” background_blend_mode=”none” filter_type=”regular” filter_hue=”0″ filter_saturation=”100″ filter_brightness=”100″ filter_contrast=”100″ filter_invert=”0″ filter_sepia=”0″ filter_opacity=”100″ filter_blur=”0″ filter_hue_hover=”0″ filter_saturation_hover=”100″ filter_brightness_hover=”100″ filter_contrast_hover=”100″ filter_invert_hover=”0″ filter_sepia_hover=”0″ filter_opacity_hover=”100″ filter_blur_hover=”0″ animation_direction=”left” animation_speed=”0.3″ first=”true” last=”true” border_position=”all” min_height=”” link=””][fusion_button target=”_self” color=”default” linear_angle=”180″ stretch=”default” icon_position=”left” icon_divider=”no” animation_direction=”left” animation_speed=”0.3″ hide_on_mobile=”small-visibility,medium-visibility,large-visibility” sticky_display=”normal,sticky” link=”javascript:history.back()” alignment=”center” dynamic_params=”e30=” size=”medium” icon=”fa-undo fas”]Go Back[/fusion_button][/fusion_builder_column][/fusion_builder_row][/fusion_builder_container]